How to Secure a WordPress Site: The Complete Guide for Website Owners (2026)
WordPress powers over 43% of all websites on the internet. That popularity makes it a prime target for hackers, malicious bots, and automated attacks. According to Wordfence, over 90,000 attacks occur on WordPress sites every minute. The good news? You don’t need to be a security expert to protect your website.
Learning how to secure a WordPress site is a skill every site owner must master. This 4,000-word, step-by-step guide will walk you through everything from beginner basics to advanced hardening techniques.
By the end of this guide, your WordPress site will be a fortress.
How to Secure a WordPress Site
Before we dive into the how, let’s address the why. A hacked WordPress site can lead to:
- Data theft (user emails, passwords, customer credit card info)
- SEO spam (hackers inject malicious links, ruining your search rankings)
- Blacklisting (Google and security tools mark your site as “dangerous”)
- Complete loss of revenue and customer trust
The average cost to recover a hacked WordPress site ranges from $500 to $5,000. Prevention is always cheaper than cure.
Now, let’s secure your site—step by step.
Step 1: Choose a Secure Hosting Provider
Security starts at the server level. If your hosting provider is insecure, nothing you do in WordPress will fully protect you.
What to look for in a host:
- Server-level firewalls (mod_security, Imunify360)
- Daily automatic backups (off-server)
- Free SSL certificates (Let’s Encrypt or similar)
- Isolated environments (avoid shared hosting with lax security)
- DDoS protection (Cloudflare integration is a plus)
Recommended hosts for security:
- Kinsta – Built on Google Cloud Platform, isolated container tech
- WP Engine – Proprietary firewall and brute force detection
- Cloudways – Choose your cloud provider (AWS, DigitalOcean) with added firewalls
- SiteGround – Custom web application firewall (WAF)
Action item: If your current host lacks these features, migrate to a security-focused host.
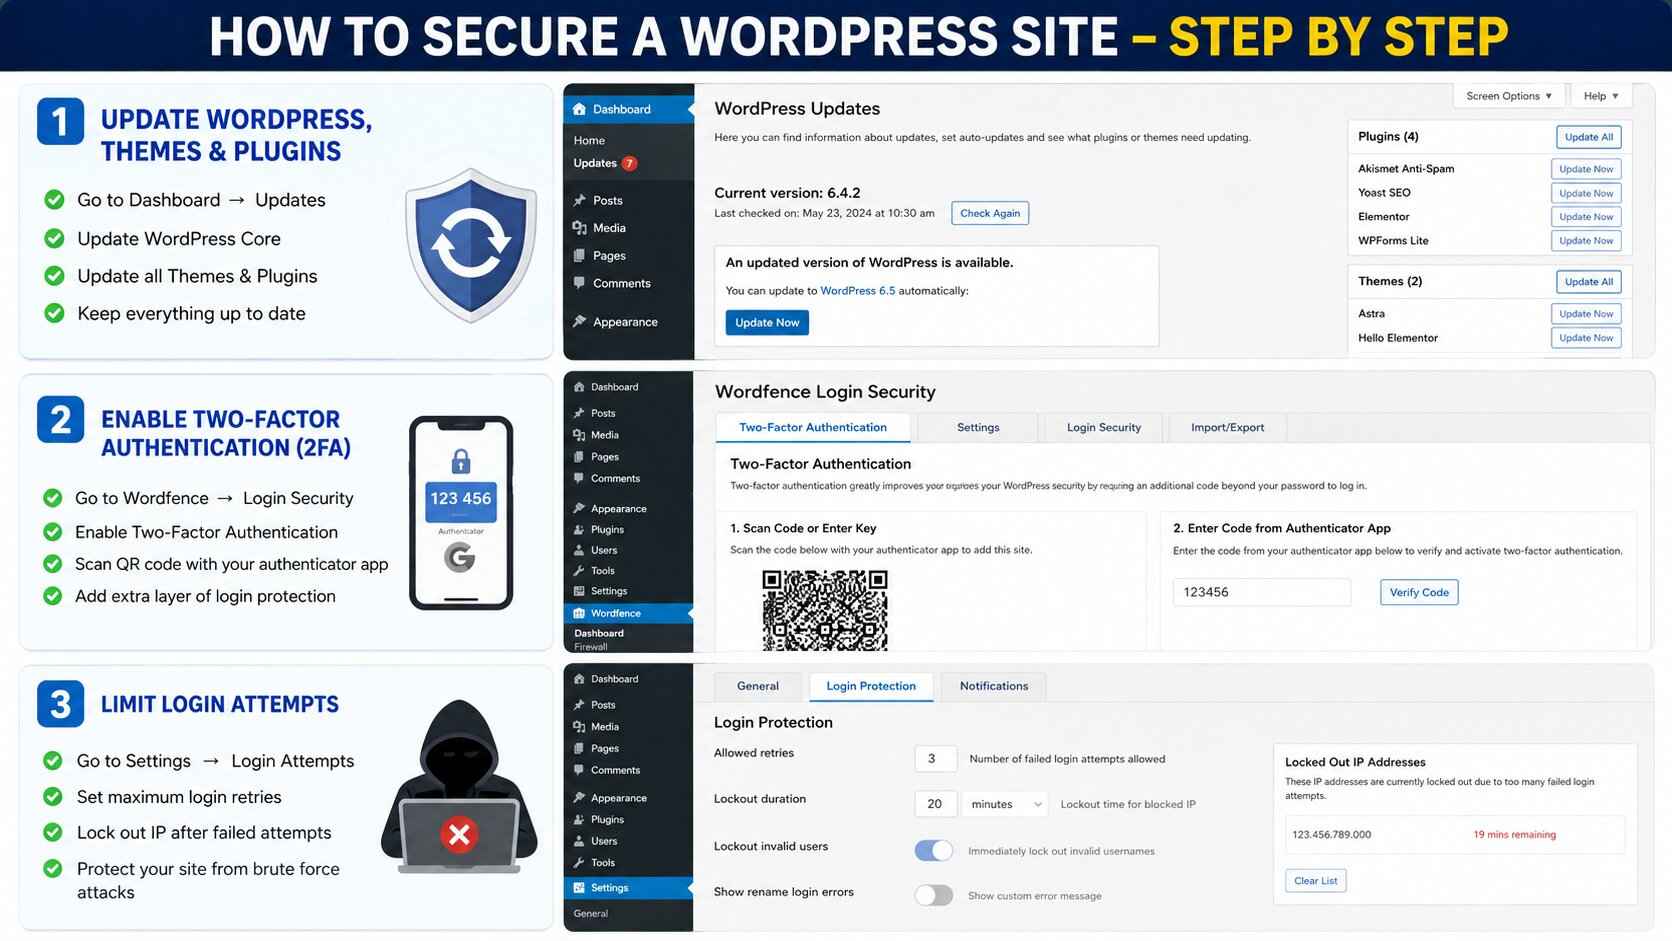
Step 2: Keep Everything Updated (Core, Themes, Plugins)
Outdated software is the #1 entry point for hackers. WordPress is open source, meaning vulnerabilities are publicly disclosed when patched.
Types of updates:
- Major core updates (e.g., 5.9 → 6.0) – Test on staging first
- Minor core updates (e.g., 6.0.1) – Usually security patches, auto-update safely
- Plugin & theme updates – Most critical. Vulnerabilities are exploited within hours of disclosure.
How to enable auto-updates:
php
// Add to wp-config.php to enable minor core auto-updates
define('WP_AUTO_UPDATE_CORE', 'minor');
For plugins, go to Plugins → Installed Plugins and click “Enable auto-updates” for trusted plugins.
Pro tip: Use a tool like ManageWP or MainWP to manage updates across multiple sites.
Action item: Check your Dashboard → Updates right now. Update everything.
Step 3: Enforce Strong Passwords & User Permissions
Weak passwords (like “admin123” or “password”) are still responsible for 40% of brute-force attack successes.
Password best practices:
- Minimum 15 characters
- Mix of uppercase, lowercase, numbers, symbols
- No dictionary words or personal info
- Never reuse passwords across sites
User role hygiene:
- Administrator – Only you (or 1-2 trusted people)
- Editor – Can publish/edit posts, no plugin/theme access
- Author – Can write/edit their own posts
- Contributor – Can write but not publish
- Subscriber – Read-only
Action item: Go to Users → All Users. Delete the default “admin” username. Remove unnecessary admin accounts.
Step 4: Enable Two-Factor Authentication (2FA)
A password alone is no longer enough. Two-factor authentication (2FA) adds a second layer: something you know (password) + something you have (phone, security key).
Best 2FA plugins for WordPress:
- Wordfence Login Security – Free, Google Authenticator compatible
- Google Authenticator – Easy setup
- WP 2FA – Advanced policies (force 2FA for admins)
How to set up 2FA:
- Install and activate Wordfence Login Security.
- Go to Login Security → Two-Factor Authentication.
- Scan the QR code with Google Authenticator, Authy, or your password manager.
- Save backup codes (store them offline).
Pro tip: Require 2FA for all administrator and editor roles.
Step 5: Install a WordPress Security Plugin
You need a centralized security dashboard. Security plugins handle firewalls, scanning, and brute force protection.
Top 3 security plugins compared:
| Feature | Wordfence | Sucuri | iThemes Security |
|---|---|---|---|
| Free tier | Yes | Limited (no firewall) | Yes |
| Web application firewall (WAF) | Endpoint firewall | Cloud-based (paid) | Endpoint |
| Malware scanning | Yes | Yes | Yes |
| Login attempts limit | Yes | Yes (paid) | Yes |
| File integrity check | Yes | Yes | Yes |
| Post-hack cleanup | No | Paid ($199+) | No |
Recommendation: Start with Wordfence Free. It includes a powerful firewall, malware scanner, and real-time traffic monitoring.
Action item: Install Wordfence → Run your first scan → Resolve any issues found.
Step 6: Change Your Login URL (Hide wp-admin)
By default, your login page is yoursite.com/wp-admin or wp-login.php. Hackers know this. Security through obscurity is a valid first step.
How to change the login URL:
Use the free plugin WPS Hide Login.
- Install and activate.
- Go to Settings → WPS Hide Login.
- Set a new login slug (e.g.,
super-secret-login). - Save. Your new login URL becomes
yoursite.com/super-secret-login.
Note: The old /wp-admin URL will now return a 404 error.
Pro tip: Do not use common slugs like login, admin, or backend. Use something random: c9x2mQ6p.
Step 7: Disable File Editing via wp-config.php
WordPress includes a built-in file editor (Appearance → Theme Editor, Plugins → Plugin Editor). If a hacker gains access to your admin panel, they can inject malicious code directly.
Disable it permanently:
Add this line to your wp-config.php file (located in your root directory):
php
define('DISALLOW_FILE_EDIT', true);
Result: The editor screens disappear entirely. You’ll need FTP or cPanel to edit files—which is more secure.
Step 8: Set Correct File Permissions
Linux-based servers rely on file permissions. Incorrect permissions can allow unauthorized writing or reading of files.
The golden rule:
- Directories:
755(drwxr-xr-x) - Files:
644(rw-r–r–) - wp-config.php:
600or440(read-only, no public access)
How to check/change permissions:
Using cPanel (File Manager) or FTP:
- Right-click your WordPress root folder.
- Set folders to 755 recursively.
- Set all files to 644 recursively.
- Set
wp-config.phpto 600 individually.
Never use 777 – that allows anyone to write, delete, or execute.
Step 9: Prevent Hotlinking & Leeching
Hotlinking is when other websites embed your images directly (using your bandwidth). This can slow your site and eat resources. Worse, they can replace your images with malicious ones.
Stop hotlinking via .htaccess (Apache) or nginx config:
Add this to your .htaccess file in the root directory:
apache
RewriteEngine on
RewriteCond %{HTTP_REFERER} !^$
RewriteCond %{HTTP_REFERER} !^http(s)?://(www\.)?yourdomain.com [NC]
RewriteRule \.(jpg|jpeg|png|gif|webp)$ - [F,NC]
For nginx, add:
nginx
location ~* \.(jpg|jpeg|png|gif|webp)$ {
    valid_referers none blocked yourdomain.com *.yourdomain.com;
    if ($invalid_referer) { return 403; }
}
Action item: Replace yourdomain.com with your actual domain.
Step 10: Block Unauthorized Access to wp-admin
Your wp-admin directory should only be accessible from your IP address (or a few trusted IPs).
For Apache (.htaccess inside /wp-admin/):
apache
Order Deny,Allow
Deny from all
Allow from 123.45.67.89   # Your home IP
Allow from 98.76.54.32    # Your office IP
Warning: If your ISP changes your IP address often, you’ll lock yourself out. Use a static IP or VPN.
Better alternative: Password-protect the entire /wp-admin/ folder using cPanel’s “Directory Privacy” feature.
Step 11: Disable XML-RPC (If Not Needed)
XML-RPC allows remote connections to WordPress (mobile apps, Jetpack, pingbacks). It’s also used for brute force amplification attacks (one request can try hundreds of passwords).
Check if you need XML-RPC:
- Do you use the WordPress mobile app? → Keep it.
- Do you use Jetpack? → Keep it.
- Do you use pingbacks/trackbacks? → Disable if not.
Disable XML-RPC:
Add to functions.php of your child theme:
php
add_filter('xmlrpc_enabled', '__return_false');
Or use a plugin: Disable XML-RPC.
To check if it’s disabled, visit yoursite.com/xmlrpc.php. You should see “XML-RPC server accepts POST requests only” (normal) or a 403 error (better).
Step 12: Move Your wp-config.php File
wp-config.php contains your database credentials. By default, it sits in the root directory. You can move it one level above the web root.
Why?
If your server misconfigures PHP parsing, an attacker could view the file as plain text.
How to move it:
- Using FTP, cut
wp-config.phpfrompublic_html/(orwww/). - Paste it into the directory above (e.g.,
/home/yourusername/). - WordPress automatically looks for
wp-config.phpone level up.
No further configuration needed. This is one of the most effective but underused security tricks.
Step 13: Add Security Headers (HTTPS, CSP, HSTS)
Security headers protect against XSS, clickjacking, and man-in-the-middle attacks.
Must-have headers:
| Header | Purpose |
|---|---|
| Strict-Transport-Security (HSTS) | Forces HTTPS for all future requests |
| X-Frame-Options | Prevents clickjacking (DENY or SAMEORIGIN) |
| X-Content-Type-Options | Stops MIME type sniffing |
| Content-Security-Policy | Blocks inline scripts/XSS |
Add via .htaccess:
apache
Header always set Strict-Transport-Security "max-age=31536000; includeSubDomains; preload"
Header always set X-Frame-Options "SAMEORIGIN"
Header always set X-Content-Type-Options "nosniff"
Header always set Referrer-Policy "strict-origin-when-cross-origin"
Force HTTPS:
In Settings → General, ensure both WordPress Address and Site Address use https://. Then add to .htaccess:
apache
RewriteEngine On
RewriteCond %{HTTPS} off
RewriteRule ^(.*)$ https://%{HTTP_HOST}/$1 [R=301,L]
Action item: Test your headers at securityheaders.com – aim for grade A or A+.
Step 14: Regular Automated Backups
Backups are your last line of defense. If you get hacked, you restore from a clean backup within minutes.
What to back up:
- Database (posts, users, settings)
wp-content/folder (themes, plugins, uploads)wp-config.phpand.htaccess
Backup strategy (3-2-1 rule):
- 3 copies of your data
- 2 different storage media (local + cloud)
- 1 offsite backup (separate server)
Best backup plugins:
| Plugin | Storage Locations | Free Tier |
|---|---|---|
| UpdraftPlus | Google Drive, Dropbox, S3 | Yes (scheduled) |
| BlogVault | Their own cloud | No (paid, but real-time) |
| Jetpack Backup | WordPress.com cloud | Paid (real-time, one-click restore) |
Action item: Install UpdraftPlus. Schedule daily backups. Send to Google Drive. Test a restore on a staging site.
Step 15: Set Up a Web Application Firewall (WAF)
A WAF filters malicious traffic before it reaches your WordPress site. It blocks SQL injections, XSS, and known exploit attempts.
Types of WAF for WordPress:
- DNS-level (Cloudflare) – Blocks at the edge, fastest, free plan available.
- Host-level (Sucuri, Wordfence) – More granular, requires a plugin.
- Cloud-based (AWS WAF) – Advanced, but complex.
Recommended setup (free + powerful):
- Sign up for Cloudflare (free plan).
- Change your domain’s nameservers to Cloudflare’s.
- In Cloudflare dashboard → Security → WAF → Enable “Managed Rules.”
- Set “WordPress” ruleset to Block.
Bonus: Cloudflare also gives you DDoS protection, CDN caching, and SSL.
Action item: Migrate your DNS to Cloudflare within 30 minutes. It’s easier than it sounds.
Step 16: Disable Directory Listing & Search Engine Indexing
Directory listing:
When no index.php or index.html exists, the server may display a full file list of your directories (e.g., /wp-content/plugins/). Hackers love this.
Disable via .htaccess:
apache
Options -Indexes
Search engine indexing:
You don’t want Google to index your wp-admin or /plugins/ folders.
Check WordPress settings: Go to Settings → Reading → Uncheck “Discourage search engines” (only for dev sites). For live sites, leave it unchecked.
Better: Add to robots.txt (via Yoast SEO or manually):
text
User-agent: *
Disallow: /wp-admin/
Disallow: /wp-includes/
Disallow: /wp-content/plugins/
Disallow: /wp-content/themes/
Step 17: Monitor User Activity & File Integrity
Hackers often create new admin users or modify core files. You need logs to detect intrusion.
User activity log plugin:
Install Simple History or WP Activity Log. Both track:
- User logins (including failed attempts)
- Plugin installations/updates
- File changes
- Permission changes
File integrity monitoring:
Wordfence (free) compares your core WordPress files, themes, and plugins against the official WordPress repository. If a file has changed unexpectedly, Wordfence alerts you.
Action item: In Wordfence → Scan → Enable “High sensitivity scanning.” Run a weekly scheduled scan.
Step 18: Protect Against Brute Force Attacks
Brute force = automated guessing of passwords. Even strong passwords can be guessed if the attacker tries millions of times.
Limit login attempts:
Wordfence does this automatically. Alternatively, use Limit Login Attempts Reloaded.
How to configure in Wordfence:
- Go to Wordfence → Login Security.
- Under “Brute Force Protection,” set:
- Max login attempts per IP: 3
- Lockout time: 30 minutes
- Enable “Immediately lock out invalid usernames.”
CAPTCHA on login:
Add Google reCAPTCHA using the plugin Login No Captcha. This stops automated bots.
Step 19: Remove Unused Themes & Plugins
Every installed plugin or theme is a potential vulnerability—even if deactivated.
Why?
Because the files still exist on your server. A hacker can directly access unused-plugin.php and exploit a known vulnerability.
Action items:
- Go to Plugins → Installed Plugins → Delete any plugin you’re not actively using.
- Go to Appearance → Themes → Keep only your active theme + one default theme (Twenty Twenty-Five for debugging). Delete all others.
- Delete
hello.php(Hello Dolly plugin).
Pro tip: Deactivate ≠ Delete. Always delete.
Step 20: Perform Regular Security Audits
Security is not a one-time task. You need a recurring checklist.
Monthly audit (15 minutes):
- Run Wordfence scan.
- Update all plugins/themes.
- Check for new admin users (Users → All Users).
- Verify backup completion (UpdraftPlus log).
- Review activity log for suspicious logins.
- Test your custom login URL (is it still working?).
- Check .htaccess for unexpected changes.
Quarterly audit (1 hour):
- Review all user permissions (remove stale accounts).
- Test a full site restore from backup on a staging server.
- Change all admin passwords (using a password manager like 1Password).
- Review your hosting account’s security settings.
Bonus: What to Do If You Get Hacked
Despite all precautions, hacks happen. Here’s your emergency protocol:
- Immediately take site offline – Use a plugin like Maintenance Mode or rename
.htaccess. - Change all passwords – WordPress admin, database, FTP, hosting control panel.
- Restore from clean backup – Use your last known good backup (before the hack).
- Rescan with Wordfence – Run a deep scan on the restored site.
- Check for backdoors – Look for suspicious files (e.g.,
wp-content/upgrade/shell.php). Use GOTMLS plugin. - Notify your hosting provider – They may have server-level logs.
- Reapply security headers and .htaccess rules – Ensure they weren’t disabled.
If you can’t clean it yourself, hire a professional: Sucuri or Wordfence Response (paid incident response).
Final Thoughts: Your Security Checklist PDF
You now have a complete, step-by-step blueprint on how to secure a WordPress site. Let’s summarize the 20 steps into one actionable checklist:
- Step 1: Secure hosting
- Step 2: Auto-updates on
- Step 3: Strong passwords & user roles
- Step 4: Two-factor authentication (2FA)
- Step 5: Security plugin (Wordfence)
- Step 6: Custom login URL
- Step 7: Disable file editing
- Step 8: Correct file permissions (755/644)
- Step 9: Hotlinking protection
- Step 10: Restrict wp-admin access
- Step 11: Disable XML-RPC
- Step 12: Move wp-config.php up one level
- Step 13: Security headers + HTTPS
- Step 14: Daily automated backups (offsite)
- Step 15: Web application firewall (Cloudflare)
- Step 16: Disable directory listing
- Step 17: Activity logging & integrity monitoring
- Step 18: Brute force protection + CAPTCHA
- Step 19: Delete unused themes/plugins
- Step 20: Monthly security audit
Implement these steps one by one. Do not try to do them all in one day—spread them over a weekend. Start with steps 2, 5, and 14 (updates, security plugin, backups). Those give you immediate protection.
Your WordPress site is now more secure than 99% of websites on the internet.
Stay secure. Stay updated. And always keep a backup.